
| sitelink1 | https://docs.microsoft.com/en-us/azure/d...ure-devops |
|---|---|
| sitelink2 | |
| sitelink3 |
Create and save managed queries with the query editor
Azure Boards | Azure DevOps Server 2019 | TFS 2018 | TFS 2017 | TFS 2015 | TFS 2013
Managed queries generate a list of work items based on the filter criteria you provide. You can create queries from the web portal or from a supported client, such as Visual Studio Team Explorer and Team Explorer Everywhere. Also, you can open a query in Excel to perform bulk additions and modifications.
Note
To create and manage queries in Visual Studio 2019, you need to Set the Work Items experience to the legacy option.
If you find that your queries take too long to return results, review the Guidance to create high-performing queries.
In this article you'll learn:
- How to open and edit a query
- How to add or create a query
- How to group query clauses
- Understand when to use a flat-list, tree, or direct-links query
- How to query across projects
For quick access to all query tasks, supported operators—such as, Contains, In, In Group, and <>(not operator) — based on field data type, and query examples, see Query quick reference.
Prerequisites
By default, all project members and users with Stakeholder access can view and run all shared queries. You can change the permissions set for a shared query folder or shared query. For details, see Set query permissions.
- You must connect to a project. If you don't have a project yet, create one.
- To view, run, or email a query, you must be granted Stakeholder access or higher. For details, see About access levels.
- To add and save a query under Shared queries, you must be granted Basic access or higher. Also, you must have your Contribute permission set to Allow for the folder you want to add the query to. By default, the Contributors group doesn't have this permission.
Note
Users with Stakeholder access for a public project have full access to query features just like users with Basic access. For details, see About access levels.
Open Queries
From your web browser, (1) check that you have selected the right project, (2) choose Boards>Queries, and then (3) choose All.
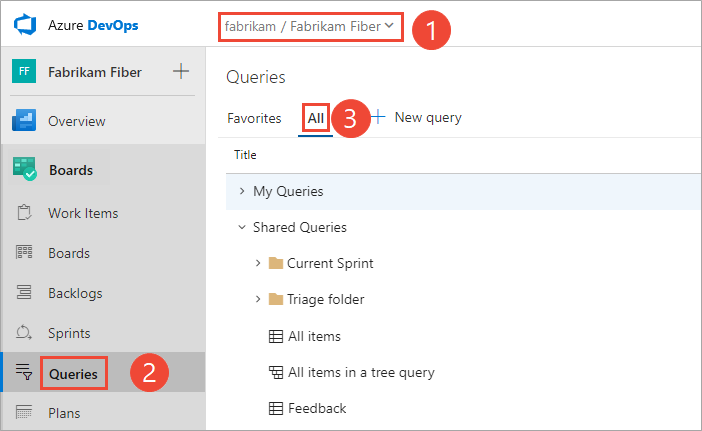
If it is your first time opening Work, the page opens to Favorites which lists all queries you have favorited. Otherwise, you can choose All to view all queries you've defined and shared queries defined for the project.
Tip
Queries you or your team have favorited show up on the Favorites page. Queries you have favorited along with other objects also appear on your Project page. To learn more, see Set personal or team favorites.
Open, edit, and save a query
The easiest way to define a query is to start with an existing shared query. The following example shows how to find all closed bugs by modifying the Active Bugs shared query provided with the Agile process template. Examples are based on the user interface provided through the web portal.
-
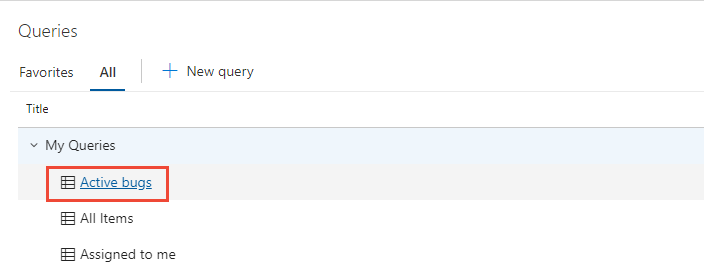
Open a shared query. For example, from the web portal, open the Active Bugs or similar flat list query.
Tip
If you're working in Visual Studio Team Explorer, open the Work page to access your queries and shared queries. If Team Explorer isn't visible, choose View>Team Explorer from the top level menu.
-
Edit the query to find closed bugs and then run the query. Use
 to insert a clause above the current clause. Use
  to delete a clause. Queries are automatically scoped to the current project. To find work items defined in several projects, see Query across projects.
-
Save the query to your My Queries folder.
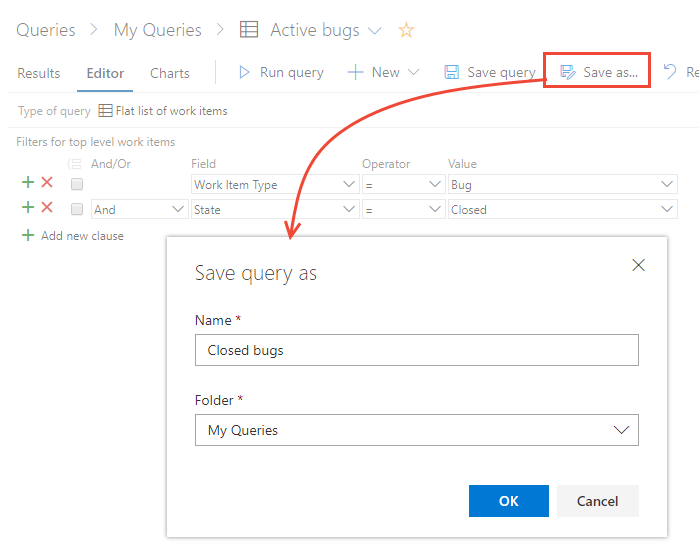
To save a query to the Shared Queries folder, you need to be a member of the Project Administrators group, or have your Contribute permissions on the folder set to Allow. To learn more, see Set query permissions.
Create a query
You can start a fresh, new query from the Queries tab in the web portal or the Work Items tab in Team Explorer.

Define a clause
You create a query by defining one or more clauses. Each clause defines a filter criteria for a single field. Choose Add new clause to add another clause and then choose the Field, Operator, and Value for that clause.

For example, you can search for all work items assigned to you by specifying the Assigned To field, the equals (=) operator, and the @Me macro which represents your user identity.
Sample query clause
For a quick reference of the operators available based on the field data type, see Query index quick reference.
All clauses you add are added as an And statement. Choose Or to change the grouping. You group clauses to ensure that the clause statements are executed in the sequence required.
Tip
To view the WIQL syntax for a query, and how parenthesis are used to group clauses, install the Marketplace Wiql Editor. This extension supports viewing the WIQL syntax and exporting it to a WIQL file for use in REST API calls. To learn more, see Syntax for the Work Item Query Language (WIQL).
Checklist for how to define a query clause
-
In the first empty row, under the Field column heading, choose the down arrow to display the list of available fields, and choose an item in the list.
For more information, see Query Fields and Values.
-
In the same row, under the Operator column heading, choose the down arrow to display the list of available operators, and choose an item in the list.
For more information, see Operators.
-
In the same row, under the Value column heading, either type a value, or choose the down arrow, and choose an item in the list.
For more information about how to use a macro or variable to specify the current project, user, date, or other selection, see Variables.
-
To add a clause, choose Click here to add a new clause or Add a new clause.
You can add a clause to the end of the query, insert a clause after an existing clause (
 ), and remove (
 ), group (
 ), and ungroup (
 ) clauses as needed.
And/Or logical expression
You specify And or Or to create logical expressions of your query clauses. Specify And to find work items that meet the criteria in both the current clause and the previous clause. Specify Or to find work items that meet the criterion in either the current clause or the previous clause.
You can add one new clause for each work item field in order to refine your search criteria, so that it returns only the set of work items that you want. If you do not receive the results that you expect from your query, you can add, remove, group, or ungroup query clauses to refine your query results.
Query clauses can be grouped to operate as a single unit separate from the rest of the query, similar to putting parentheses around an expression in a mathematical equation or logic statement. When you group clauses, the AND or OR for the first clause in the group applies to the whole group.
Group clauses
Grouped clauses operate as a single unit separate from the rest of the query, similar to putting parentheses around a mathematical equation or logic expression. The And or Or operator for the first clause in the group applies to the whole group.
As the following examples show, the grouped clauses are translated to the corresponding logical expression.
Tip
To view the WIQL syntax for a query, install the WIQL query editor extension which will allow you to see the WIQL version of any Query UI entry. This extension allows you to see just how AND/OR grouped clauses are treated.


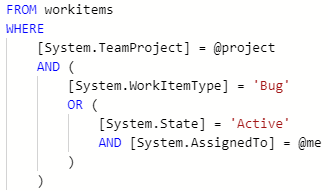
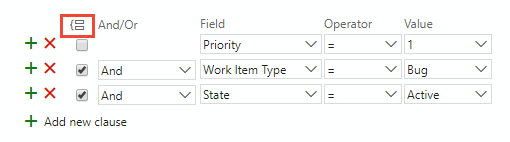
These queries return work items that are type Bug and meet the following logical expressions:
- Query 1: AND State=Active OR Assigned to @Me
- Query 2: AND (State=Active OR Assigned to @Me)
- Query 3: OR (State=Active AND Assigned to @Me)
To group one or more clauses, select them and then choose the ![]() group clauses icon.
group clauses icon.
You can also group several grouped clauses by checking the boxes of each clause that has already been grouped, and then choose the ![]() group clauses icon.
group clauses icon.
If your query results don't return expected results, follow these steps:
- Make sure that each clause is defined as you intended.
- Verify And/Or assignments to each clause. If your results contain more work items than expected, often an Or clause is present instead of an And clause.
- Determine if you need to group or change the grouping of the query clauses and the And/Or assignments of each grouped clause.
- Add more query clauses to refine your query filter criteria.
- Review the options available to specify fields, operators, and values.
Ungroup a clause
To ungroup a clause, choose the ![]() ungroup clauses icon for the grouped clause.
ungroup clauses icon for the grouped clause.
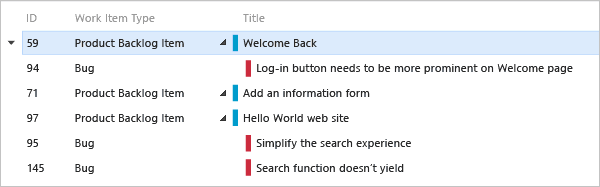
Use a tree query to view hierarchies
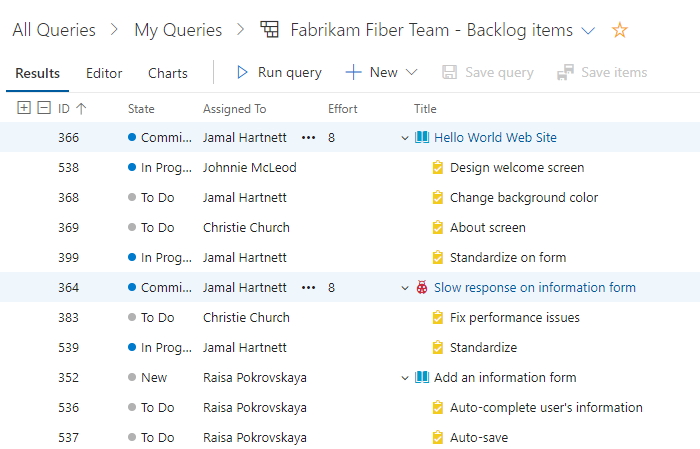
Use the tree query ( ) to view a multi-tiered, nested list of work items. For example, you can view all backlog items and their linked tasks. Expand (Expand node (
 ) or collapse (
 ) nodes to focus on different parts of the tree.
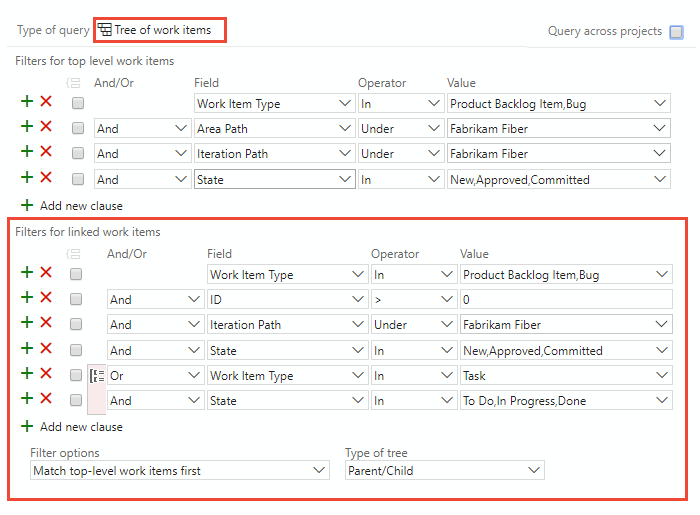
Define the filter criteria for both parent and child work items. To find linked children, select Match top-level work items first. To find linked parents, select Match linked work items first.
Note
You can't construct a query that shows a hierarchical view of Test Plans, Test Suites, and Test Cases. These items aren't linked together using parent-child link types. You can view the hierarchy through the Test>Test Plans page.
Use direct links to view dependencies
Use the direct links query ( ) to track work items that depend on other tracked work, such as tasks, bugs, issues, or features. For example, you can view backlog items that depend on other items being implemented or a bug being fixed.
Use the direct links query to track dependencies your team has that other teams work on, or manage commitments your team has made to other teams. Specify the filter criteria for both top and linked work items, and select the types of links used to filter the dependencies.
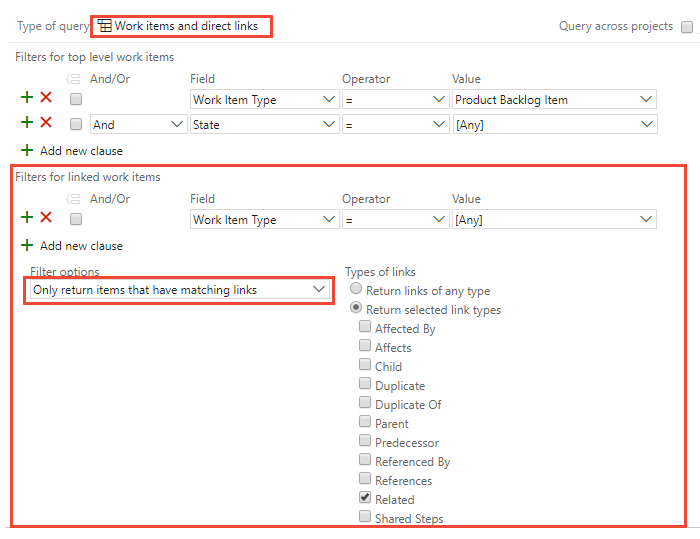
Filter your first-tier list of work items by choosing one of these options:
-
Only return work items that have the specified links: First-tier work items are returned, but only if they have links to work items specified by the linked work items filter criteria.
-
Return all top level work items: All first-tier work items are returned regardless of the linked work items filter criteria. Second-tier work items that are linked to the first tier are returned if they match the linked work items filter criteria.
-
Only return work items that do not have the specified links: First-tier work items are returned, but only if they do not have links to work items specified by the linked work items filter criteria.
To learn more about each link type, see Linking, traceability, and managing dependencies.
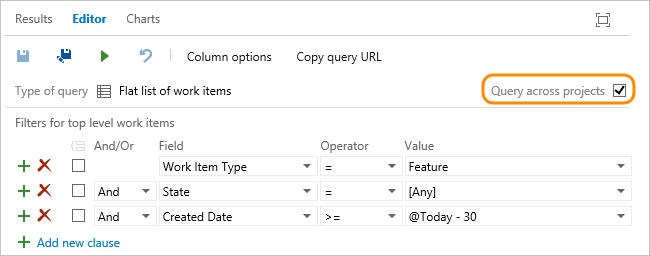
Query across projects
By default, shared queries and new queries are scoped to the current project. However, you can create queries to find work items defined within the project collection. You save cross-project queries under a specific project.
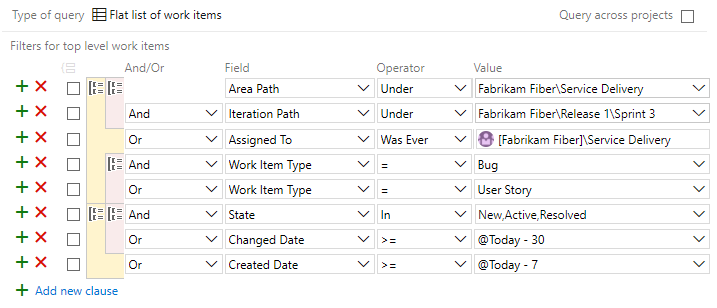
To list work items defined in two or more projects, checkmark Query across projects. For example, the following query finds all features created in all projects within the last 30 days.
With the Query across projects checked, you can add the Team Project field to filter to a select number of projects.
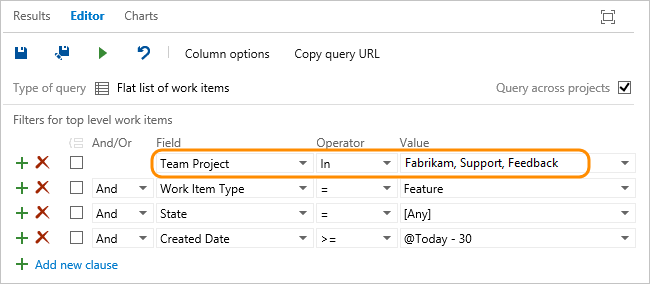
Note
Separate multiple project names with the list separator that corresponds to the regional settings defined for your client computer, for example, a comma (,).
The Team Project field becomes available only after you check Query across projects. Moreover, when Query across projects is unchecked, only those fields from those WITs defined in the current project appear in the Field drop-down menu. When Query across projects is checked, all fields from all WITs defined in all projects in the collection appear in the Field drop-down menu.
Taskboard versus query list items
You may notice and wonder why the contents of the taskboard differ from those listed with its created query? To learn more, see taskboard items versus query list items.
Export a query
From the query editor in Team Explorer, use the File menu to save a query as a .wiq file. When you create a project, the shared queries are created based on .wiq files defined in a process.
See also:
Note
The WIQL length must not exceed 32K characters. The system won't allow you to create or run queries that exceed that length.
Related articles
That's the basics about using queries. For an index of query examples, see Create managed queries. To add a custom field to track additional data, see Customize your work tracking experience.
- Ad hoc versus managed queries
- Add work items
- Chart a flat-list query
- Change column options
- Define a query as a hyperlink
- Work item field index
- Query keyboard shortcuts
If you want to export a query to Excel, you can do that from Excel or Visual Studio/Team Explorer. Or, to export a query directly from the web portal Queries page, install the VSTS Open in Excel Marketplace extension. This extension will add in Open in Excel link to the toolbar of the query results page.
REST API
To programmatically interact with queries, see one of these REST API resources:
- Azure DevOps Services REST API Reference
- Queries
- Work item query language
- Work item query language (WIQL) syntax
- Fetch work items with queries programmatically