
Using Microsoft TFS 2015 Update-3 for Java Projects (Build, Test and Deploy):
Nowadays, TFS is used for Java/J2EE projects integrated with Eclipse IDE. And with TFS 2015 Update 3, one can connect to any Team Foundation Server Git repo, using an SSH key.
Team Foundation Server (TFS) is an ALM product from Microsoft which provides the capabilities for an end to end development and testing using Work Item Management, Project Planning (Waterfall or Scrum), Version Control, Build/Release (Deploy) and Testing capabilities.
NOTE: This tutorial has many images so allow it to load properly.
Introduction to Microsoft TFS
TFS is tailored for Microsoft Visual Studio and Eclipse on all platforms, however, it can also be used as a back-end to several IDEs (Integrated Development Environments)
Though TFS is more widely used for .NET development using Visual Studio.NET IDE, it can also be used for Java/J2EE projects integrated with Eclipse IDE.
Now let us see the various activities performed once a TASK work item is raised in TFS
- Link TASK work item to the Java code
- Automated maven build
- Code Analysis triggered using SonarQube
- Deploy to Tomcat app server
Prerequisite
- Microsoft TFS 2015 Update 3
- SonarQube 6.4 or above
- Eclipse latest version (Luna used in this article)
- JDK 1.8 and Maven 3.x installed on the build server. To configure JDK and install/configure Maven you can check the URL here: How to install Maven on Windows
- Tomcat v7 or 8
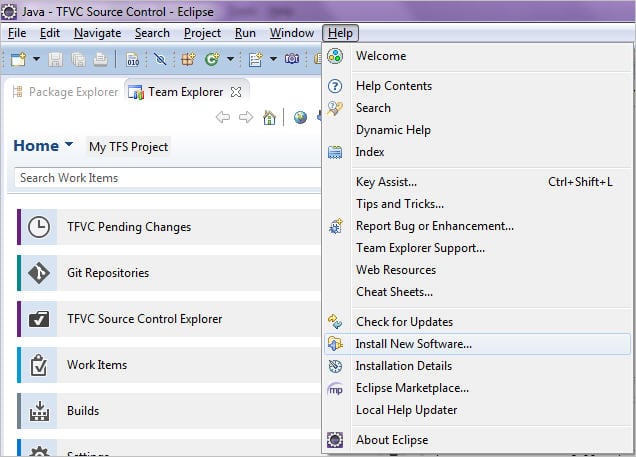
Install the Visual Studio TEE Plugin for Eclipse
The Visual Studio TEE (Team Explorer Everywhere) plugin for Eclipse helps to connect to the TFS server and perform version control activities on the Java code.
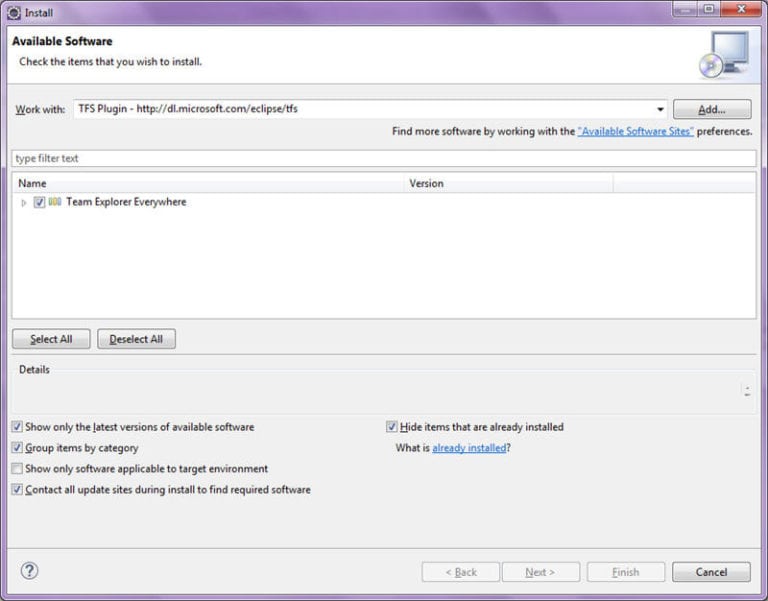
Install the plugin to Eclipse using Help => Install New Software
Click here to Update site to install the plugin.
(Note: Click on any image for enlarged view)
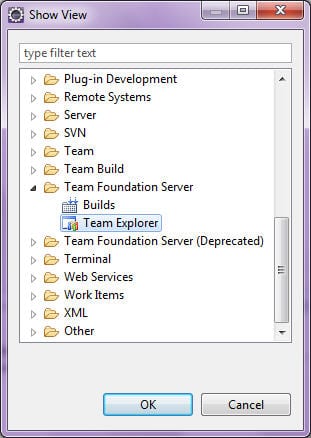
Open the TFS Team Explorer to connect to the TFS server from Window => Show View => Other and select Team Explorer

Click on Connect to Team Services or a Team Foundation Server


Create a J2EE Maven Project in Eclipse and share the project to TFS Version Control (VC)


First time Check-in to TFS VC


View of J2EE Maven Web project checked into TFS. Click on the CODE hub to look at the J2EE web project added to the repository

Traceability of Work Item with Source Code
One of the common issues often seen is that there is no traceability across lifecycle which leads to inconsistencies during development and delivery. So once a TASK/BUG is raised by PM it is simply kept at the back of mind and developed, which is not the right way of development.
Traceability helps to understand the status of artifacts across lthe ifecycle. To establish traceability change the source code, link to TASK/BUG work item and check-in.


Select the Work Item and then click Check-in


Open the Task Work Item and look at the links TAB to see the traceability established.


Creating Build Definition with Code Analysis (SonarQube)
A build definition consists of series of Tasks which are executed during an automated build process. Example of tasks can consist of running a Maven/ANT build, MS Build, executing PowerShell or Shell scripts etc.
Some of the tasks, not available by default, are available as an extension which must be downloaded and installed into TFS. Since we would be deploying a J2EE WAR file to tomcat, we would need to download and install this extension as a task. We will see this later in the next section
To create a Build Definition login to TFS web interface and go to Builds TAB. Click on + to create a build definition. Start with EMPTY definition and then click Next.


Save the Build Definition and add the Maven build Step as shown below. Optionally if the artifacts need to be stored on the server, then add a build step ‘Copy and Publish Build Artifacts’


Select the POM file and add Maven Goal(S) such as clean install
Enable ‘Run SonarQubeAnalysis’. Click on Manage to provide the SonarQube URL and user id/password.
Click to create a Generic – New Service Endpoint which needs to be provided in the Maven Task


Click Ok

Back in the Build Definition screen add this service endpoint to the SonarQube setting and then Save the Build Definition

Add ‘Copy and Publish Build Artifacts’ to store artifacts on server which will be used later in the Release Definition

This completes the Build Definition for the J2EE Web project, which includes running Code Analysis using SonarQube rules once the Build is completed. This process can be referred as Continuous Integration.
Installing an Agent
In order to Build and Deploy web applications, a windows agent should be downloaded and installed.
1) To download and install in TFS web go to the URL
http://{your_server}:8080/tfs/_admin/_AgentPool
Click on Download agent as a ZIP file.

2) Extract the agent ZIP file to a smaller folder like d:\tfsagent and then run the file as administrator to Install the agent
ConfigureAgent.cmd

Enter details as asked for

3) Install similarly on the Deployment machine if different and Start the agent on Build and Deployment machine

4) The agent is listed. To this agent add a capability to look at the path of CURL utility. This needs to be installed on the DEPLOYMENT server for deploying to Tomcat. Then click on Save Changes

To install VSO Agent for Linux see instructions to download from Deploy an agent on Linux
Creating a Release for Deployment
Now, let us look at the Continuous Deployment (CD) process which means that the automated deployment will begin once the Build is successful.
You will be able to see that, once the changes to the source code are checked-in the Automated Build, Deployment will run to all the environments defined.
1) Firstly as we would be deploying the WAR file to Tomcat app server, ensure to download and install the Tomcat extension deploy step from the Visual Studio marketplace.
2) After download, install it as per the instructions given.


Click on Install, to install the extension to the Collection


Click Close. Now we can use the extension for automated deployment of WAR file to Tomcat app server.
Also, ensure Tomcat version 7 or 8 is installed on the deployment machine and if it is running or not.

Create the Release
Go to Release Tab and click on +. Start with empty release definition and add the Apache Tomcat deployment task.

Save the release and rename the environment as QA. Click on the ‘Link to a build definition’

Link the release definition to the build definition so that once the build is successful the deployment would be automatically called. No manual intervention is required here.
Click on the Link after selecting the Build Definition

Configure the Deployment Condition for the deployment to begin once the Build is successful and completed.


Add the Deploy Apache Tomcat step. Click on Add => Close


Lastly, in the Triggers tab of the Release Definition select the radio button ‘Continuous Deployment’ with the Build Definition. This ensures that deployment would automatically be triggered once the build is successfully completed.

Save the Release Definition
Initiate the Automated Build and Deployment
Once a code change is done the Build and Deployment will be triggered automatically. Let’s do a change in the code and see the entire CI / CD process being automated. No manual intervention is required here.

Build Results

SonarQube Code Analysis Results

Deployment to Tomcat

Conclusion
Microsoft TFS can be used for Java projects in a DevOps scenario. The benefit that users can take from this is a completely automated build and deployment process to various environments (Dev, QA, Pre-Prod etc.) without any manual intervention and also hooks up with code analysis tools like SonarQube.
In my experience, I have seen several manual steps for the activities done above for which it takes months for the new features / change requests / bug fixes to be deployed from Dev to PROD environment. So ALM tools like Microsoft TFS helps to reduce the deployment cycle which helps organizations to deploy quality software faster.
So any organization who has already invested in Microsoft TFS licenses can use the tool for .NET and Java projects. Most importantly to use in a DevOps model.